React Native Maps Tutorial: Find My Friends
In this tutorial, we're going to be building a "Find My Friends"-like app using React Native, react-native-maps and the Scaledrone React Native client.
You can find the full source code from GitHub.
This tutorial will teach you:
- How to draw a map using
react-native-mapsand an overlay UI on top of it. - How to track your current location and send it to your friends.
- How to move markers in real-time using Scaledrone.
This tutorial expects a basic understanding of React Native.
Project structure
The project is divided into two independent parts:
- A React Native app. You can run the app in an iOS emulator. If you wish to run the code on Android scroll to the very bottom.
- An authentication server. The server authenticates a joining user and controls which parts of Scaledrone they can access.
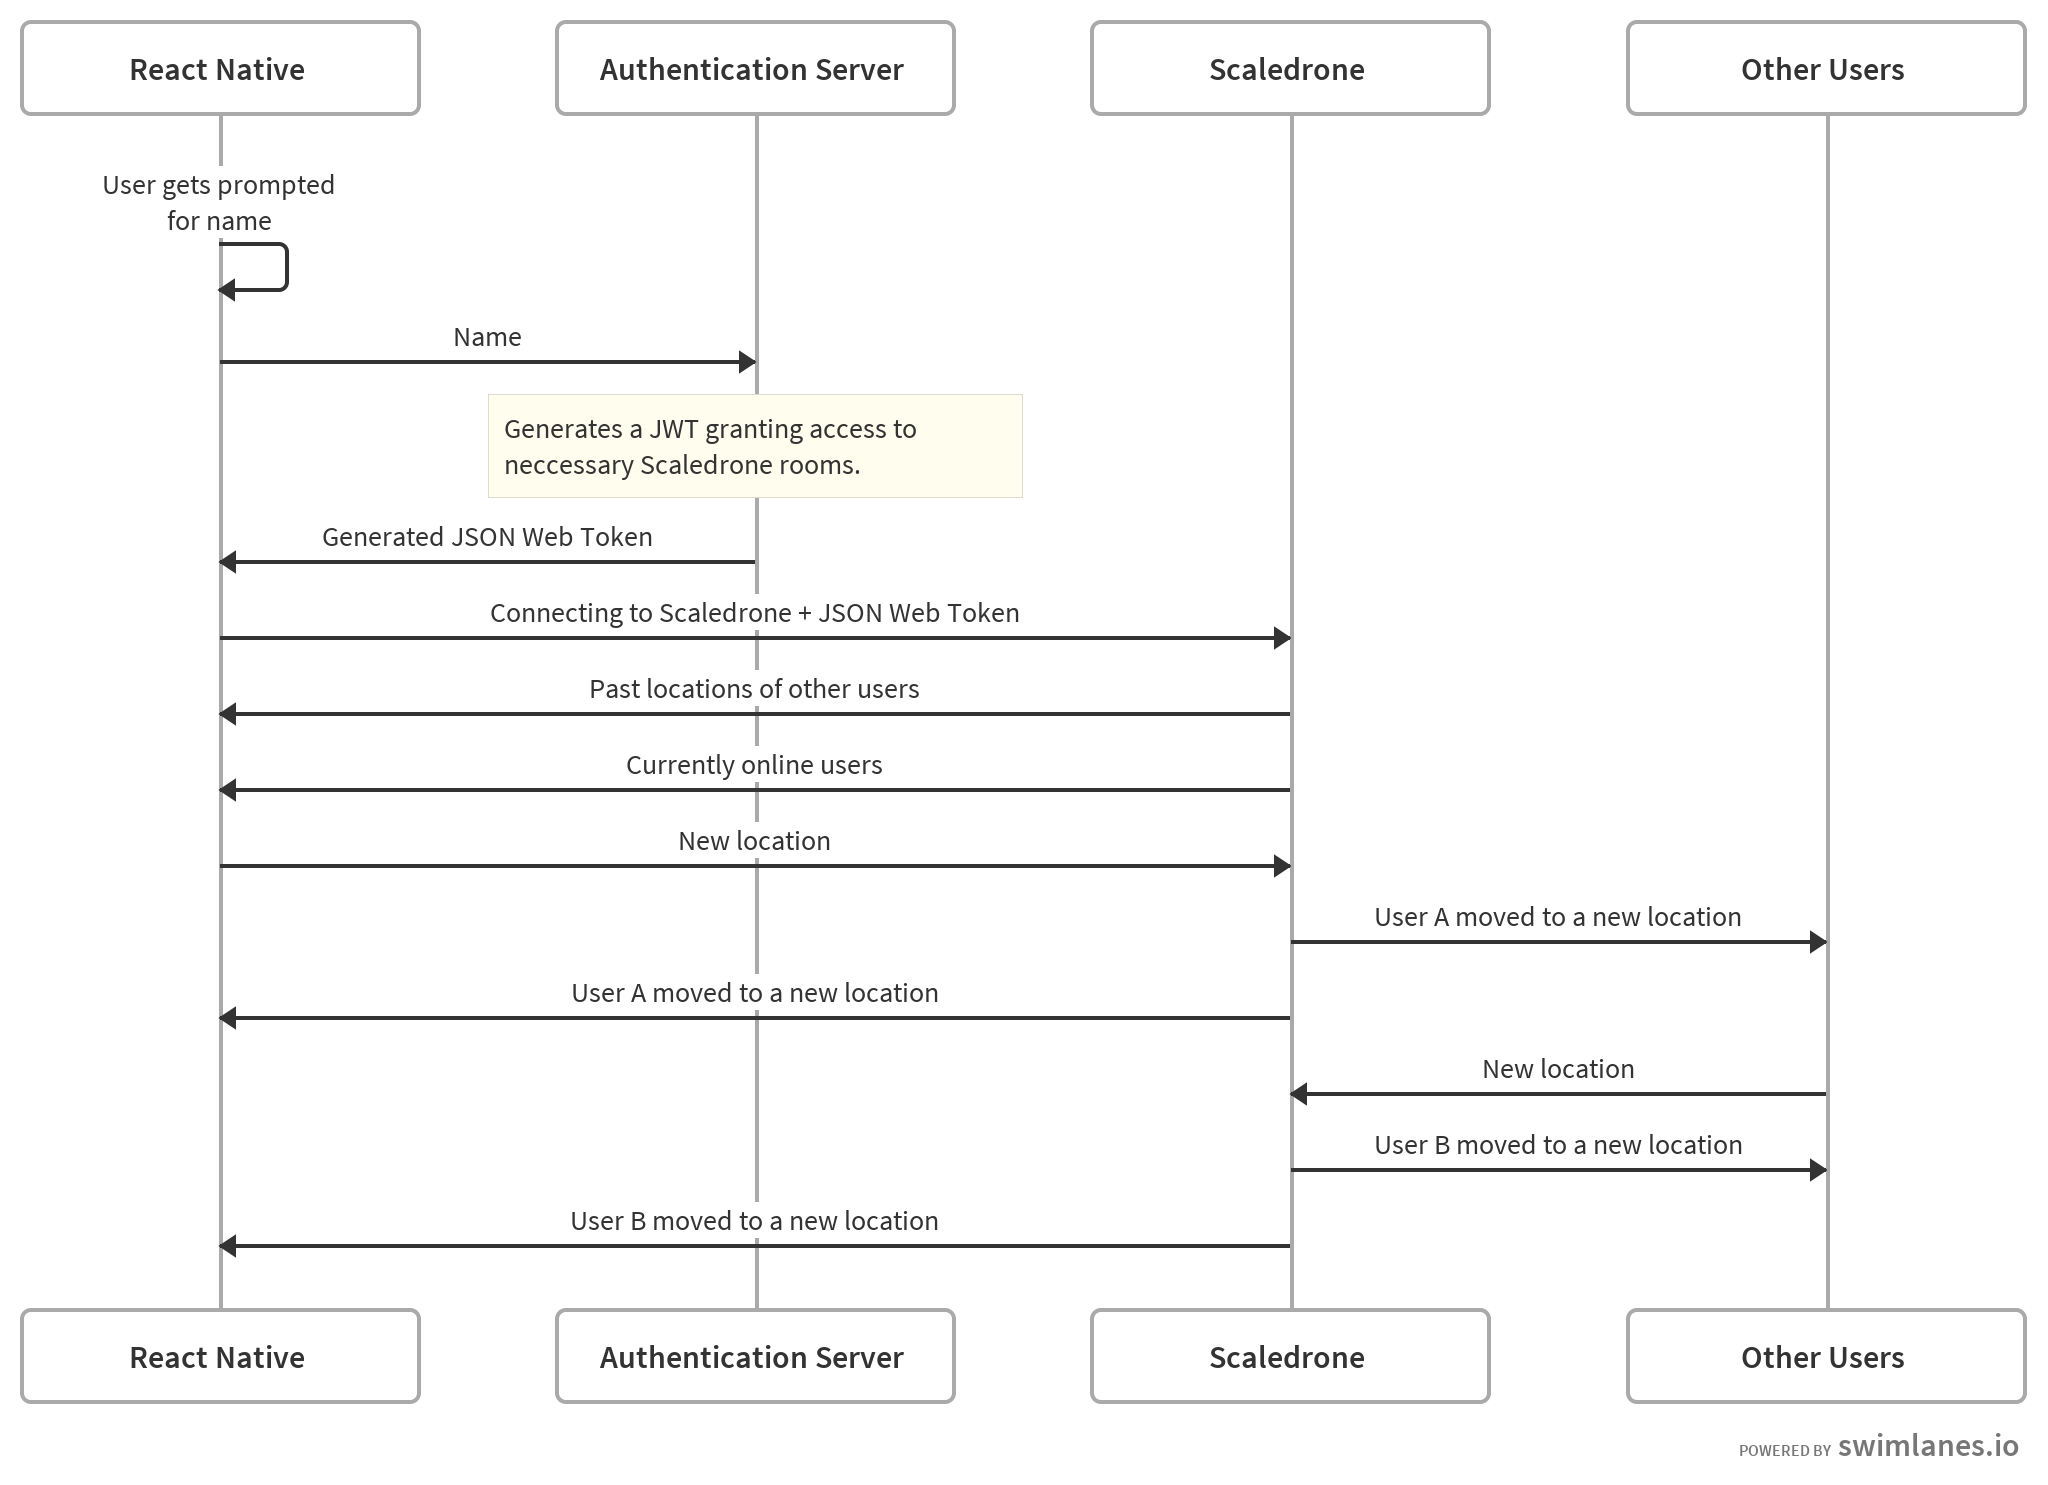
This is how our app will work:
Creating the React Native app
Setting up react-native-maps
You can find the freshest info on how to set up react-native-maps from their setup guide.
All of the code in this tutorial be run using Apple Maps. Apple Maps is the default maps provider on iOS. That way you don't need to configure Google Maps.
Rendering the map
Let's get started with the App.js file. As we progress, we'll be adding more code to this file.
If you ever get stuck following this tutorial check out the full source file on GitHub.
The following code will draw a full-screen map and a button.
import React, {Component} from 'react';
import {
  StyleSheet,
  View,
  Text,
  Dimensions,
  TouchableOpacity,
  AlertIOS,
} from 'react-native';
import MapView, {Marker, AnimatedRegion} from 'react-native-maps';

const screen = Dimensions.get('window');

const ASPECT_RATIO = screen.width / screen.height;
const LATITUDE_DELTA = 0.0922;
const LONGITUDE_DELTA = LATITUDE_DELTA * ASPECT_RATIO;

export default class App extends Component {

  render() {
    return (
      <View style={styles.container}>
        <MapView
          style={styles.map}
          ref={ref => {this.map = ref;}}
          initialRegion={{
            latitude: 37.600425,
            longitude: -122.385861,
            latitudeDelta: LATITUDE_DELTA,
            longitudeDelta: LONGITUDE_DELTA,
          }}
        >
          {this.createMarkers()}
        </MapView>
        <View pointerEvents="none" style={styles.members}>
          {this.createMembers()}
        </View>
        <View style={styles.buttonContainer}>
          <TouchableOpacity
            onPress={() => this.fitToMarkersToMap()}
            style={[styles.bubble, styles.button]}
          >
            <Text>Fit Markers Onto Map</Text>
          </TouchableOpacity>
        </View>
      </View>
    );
  }
}

const styles = StyleSheet.create({
  container: {
    ...StyleSheet.absoluteFillObject,
    justifyContent: 'flex-end',
    alignItems: 'center',
  },
  map: {
    ...StyleSheet.absoluteFillObject,
  },
  bubble: {
    flex: 1,
    backgroundColor: 'rgba(255,255,255,0.7)',
    paddingHorizontal: 18,
    paddingVertical: 12,
    borderRadius: 20,
    marginRight: 20,
  },
  button: {
    width: 80,
    paddingHorizontal: 12,
    alignItems: 'center',
    marginHorizontal: 10,
  },
  buttonContainer: {
    flexDirection: 'row',
    marginVertical: 20,
    backgroundColor: 'transparent',
    marginBottom: 400,
  },
  members: {
    flexDirection: 'column',
    justifyContent: 'flex-start',
    alignItems: 'flex-start',
    width: '100%',
    paddingHorizontal: 10,
  },
});
Connecting to Scaledrone
Now that we have a map set up we can start adding additional logic to it. Next, we should connect to Scaledrone. We'll be using Scaledrone to keep track of the connected users and receive and publish real-time location updates.
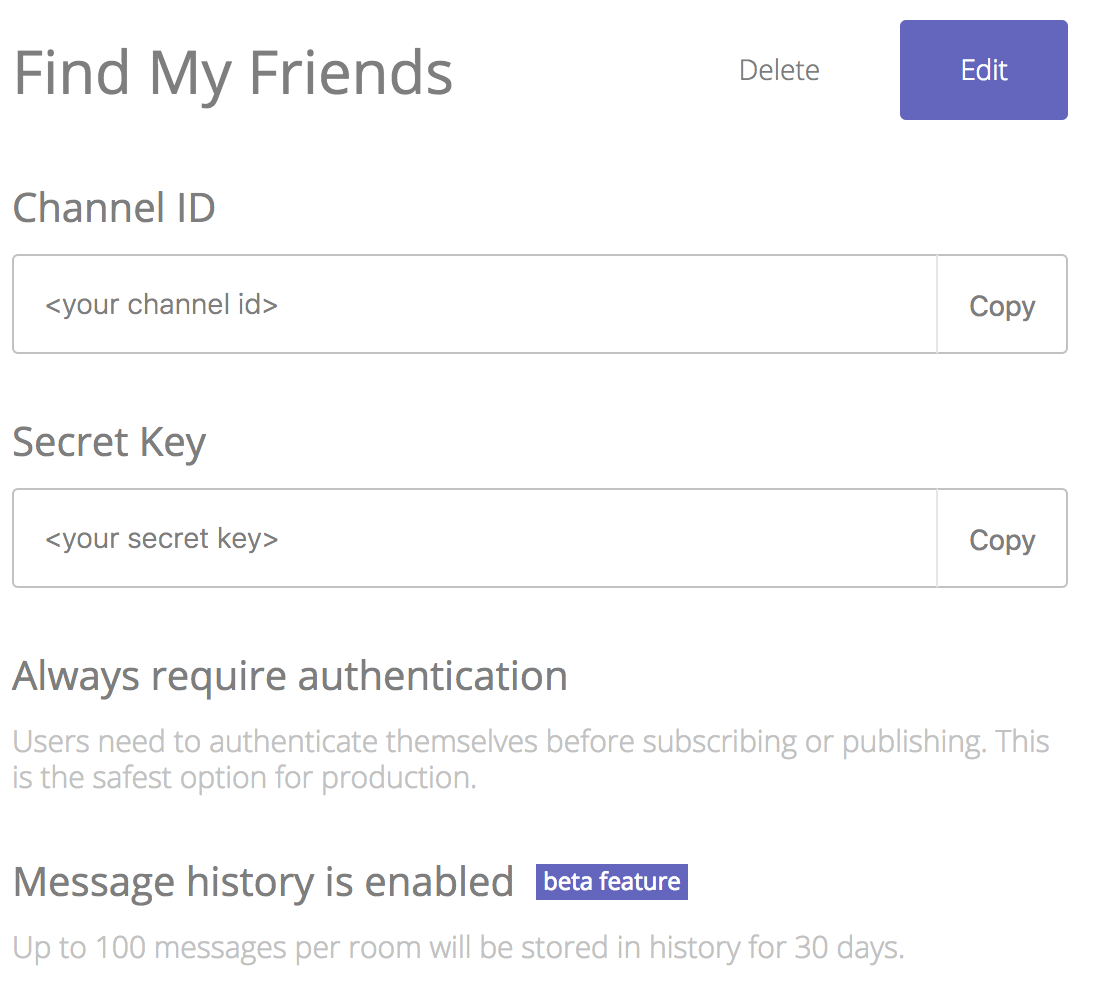
Don't worry, Scaledrone is free for up to 20 concurrent users and 100,000 daily events. Just go to scaledrone.com, sign up and create a new Scaledrone channel.
Within the Scaledrone channel settings, enable the message history and set the authentication setting to Always require authentication.
Let's add the constructor() and componentDidMount() functions. Inside the constructor() we're going to initialise a state holding an array of connected members. The member object is the Scaledrone member object to which we will also assign an AnimatedRegion marker location.
Example member object:
{
  id: '6jmItzqXbT:rT9M2uNHxK', // unique user ID assigned by Scaledrone
  authData: { // authData is created by the JWT sent from the authentication server
    color: '#f032e6', // unique color hash from the authentication server
    name: 'John' // user is prompted to insert their name
  },
  location: AnimatedRegion // react-native-maps marker location
}
Now that you know what the member object looks like let's take a look at the explanation for the code block in which we connect to Scaledrone.
- We create a new instance of Scaledrone to which you have to pass the ID of the newly created channel.
- We use
AlertIOS.prompt()to ask for the user's name. - We do a request to the authentication server (which we will create in the second part of the tutorial) using
doAuthRequest(). - We subscribe to the 'observable-locations' room. You can name the room anything you want, but for the observable rooms feature to work, the room needs to be prefixed with 'observable-'.
- We set up listeners for a few events:
- The
openevent shows that the user connected to the room. Once we receive this, we can start tracking our location. We'll define this function at a later step. - The
dataevent listens to new incoming messages (user locations in our case). - The
history_messageevent provides the past messages. We ask for 50 messages from the room's history. - The
membersevent lists all of the users connected to the room at the time of the connection. - The
member_joinevent shows that a new user joined the room. - The
member_leaveevent shows that a user has left the room.
- The
const Scaledrone = require('scaledrone-react-native');
.
.
.

export default class App extends Component {

  constructor() {
    super();
    this.state = {
      members: []
    };
  }

  componentDidMount() {
    const drone = new Scaledrone('<YOUR_SCALEDRONE_CHANNEL_ID>');
    drone.on('error', error => console.error(error));
    drone.on('close', reason => console.error(reason));
    drone.on('open', error => {
      if (error) {
        return console.error(error);
      }
      AlertIOS.prompt(
        'Please insert your name',
        null,
        name => doAuthRequest(drone.clientId, name).then(
          jwt => drone.authenticate(jwt)
        )
      );
    });
    const room = drone.subscribe('observable-locations', {
      historyCount: 50 // load 50 past messages
    });
    room.on('open', error => {
      if (error) {
        return console.error(error);
      }
      this.startLocationTracking(position => {
        const {latitude, longitude} = position.coords;
        // publish device's new location
        drone.publish({
          room: 'observable-locations',
          message: {latitude, longitude}
        });
      });
    });
    // received past message
    room.on('history_message', message =>
      this.updateLocation(message.data, message.clientId)
    );
    // received new message
    room.on('data', (data, member) =>
      this.updateLocation(data, member.id)
    );
    // array of all connected members
    room.on('members', members =>
      this.setState({members})
    );
    // new member joined room
    room.on('member_join', member => {
      const members = this.state.members.slice(0);
      members.push(member);
      this.setState({members});
    });
    // member left room
    room.on('member_leave', member => {
      const members = this.state.members.slice(0);
      const index = members.findIndex(m => m.id === member.id);
      if (index !== -1) {
        members.splice(index, 1);
        this.setState({members});
      }
    });
  }

  .
  .
  .
Install Scaledrone:
npm install scaledrone-react-native --save
Tracking our location
Tracking the location of your device is pretty straightforward. React Native supports the HTML5 Geolocation API. Each time we receive a location update we publish it to the Scaledrone room (we did that in the componentDidMount() function).
If you're running the tutorial on an iOS emulator, you might wonder why your pin ends up in San Francisco. This is the default location of the iOS emulator's Geolocation API.
startLocationTracking(callback) {
  navigator.geolocation.watchPosition(
    callback,
    error => console.error(error),
    {
      enableHighAccuracy: true,
      timeout: 20000,
      maximumAge: 1000
    }
  );
}
The location message we send to the other users looks like this:
{
    longitude: -122.164275,
    latitude: 37.442909
}
Rendering the online users list
The createMembers() method will display a list of currently online users on the bottom left of the map. Each user will be prompted to enter their name and will also be assigned a unique color from our authentication server (which we will be creating later).
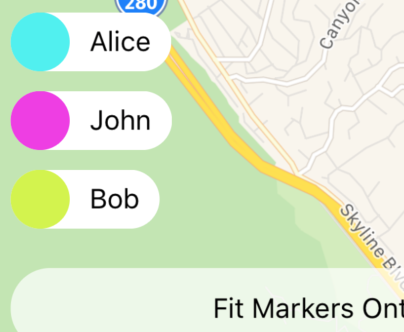
We're iterating over all of the members in our local state and rendering them as a colorful circle and a name.
createMembers() {
  const {members} = this.state;
  return members.map(member => {
    const {name, color} = member.authData;
    return (
      <View key={member.id} style={styles.member}>
        <View style={[styles.avatar, {backgroundColor: color}]}/>
        <Text style={styles.memberName}>{name}</Text>
      </View>
    );
  });
}
We'll also be adding style to the elements:
member: {
  flexDirection: 'row',
  justifyContent: 'center',
  alignItems: 'center',
  backgroundColor: 'rgba(255,255,255,1)',
  borderRadius: 20,
  height: 30,
  marginTop: 10,
},
memberName: {
  marginHorizontal: 10,
},
avatar: {
  height: 30,
  width: 30,
  borderRadius: 15,
}
Rendering the map markers
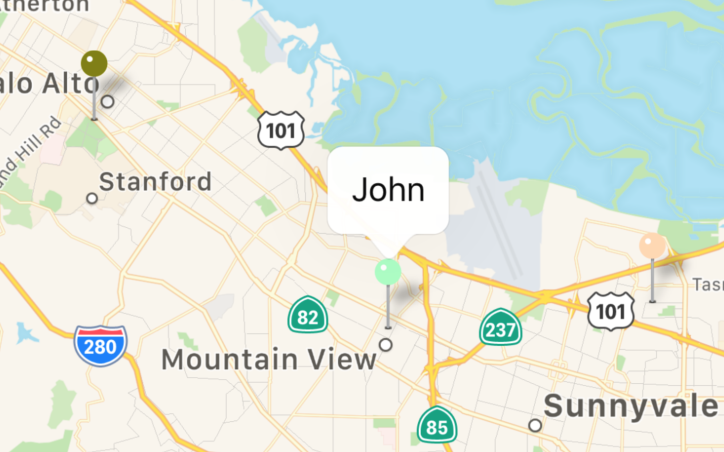
Each of the connected members will be displayed as an animated Marker on the map. The marker (or a pin in Apple Maps) will be colored, assigned a title and set to a coordinate on the map.
We're excluding members who don't have a location assigned to them. This situation can occur when a member just joined the Scaledrone room but hasn't yet published its location.
createMarkers() {
  const {members} = this.state;
  const membersWithLocations = members.filter(m => !!m.location);
  return membersWithLocations.map(member => {
    const {id, location, authData} = member;
    const {name, color} = authData;
    return (
      <Marker.Animated
        key={id}
        identifier={id}
        coordinate={location}
        pinColor={color}
        title={name}
      />
    );
  });
}
Fitting markers onto the screen
To make it easier to find the markers we've added the "Fit Markers Onto Map" button. The react-native-maps fitToSuppliedMarkers() function works by taking an array of Marker IDs and zooming the view so that all the provided markers are visible on the screen.
fitToMarkersToMap() {
  const {members} = this.state;
  this.map.fitToSuppliedMarkers(members.map(m => m.id), true);
}
Authenticating the connection
To authenticate the connection we're going to be using Scaledrone's JSON Web Token authentication. JWT authentication is handy because it allows for your own servers to define precise access levels - the users will only be able to access the rooms you allow them to.
In the next section of the tutorial, we're going to be building a small Node.js authentication server running on port 3000.
But first, let's make a POST request to that server on the URL http://localhost:3000/auth and send it the user's clientId (accessible via drone.clientId) and the name.
If we're allowed to connect the server will provide us with a JSON Web Token defining our access rights inside the Scaledrone channel. We will then pass that token on to Scaledrone.
The open handler triggers this request, and the actual request looks like this:
function doAuthRequest(clientId, name) {
  let status;
  return fetch('http://localhost:3000/auth', {
    method: 'POST',
    headers: {
      'Accept': 'application/json',
      'Content-Type': 'application/json',
    },
    body: JSON.stringify({clientId, name}),
  }).then(res => {
    status = res.status;
    return res.text();
  }).then(text => {
    if (status === 200) {
      return text;
    } else {
      alert(text);
    }
  }).catch(error => console.error(error));
}
Authentication Server
In this part of the tutorial, we'll be looking at the JWT authentication server.
The authentication server is a simple Express app which contains a single POST /auth route.
After the user receives the open event from Scaledrone the React Native app does a request to the server passing the name and clientId as POST parameters. If the user provides a valid name and clientId, we generate a JSON Web Token using the jsonwebtoken library.
The JWT defines which rooms the client can access using the permissions clause. The room name is described as a regex. Inside the room, the user will be allowed to subscribe to messages, publish messages and query up to 50 messages from the history.
const express = require('express');
const jwt = require('jsonwebtoken');
const colors = require('./colors');
const bodyParser = require('body-parser');
const cors = require('cors');

const app = express();
app.use(bodyParser.json());
app.use(cors());

app.post('/auth', (req, res) => {
  const {clientId, name} = req.body;
  if (!clientId || clientId.length < 1) {
    res.status(400).send('Invalid ID');
  }
  if (!name || name.length < 1) {
    res.status(400).send('Invalid name');
  }
  const token = jwt.sign({
    client: clientId,
    channel: '<YOUR_SCALEDRONE_CHANNEL_ID>',
    permissions: {
      "^observable-locations$": {
        publish: true,
        subscribe: true,
        history: 50,
      }
    },
    data: {
      name,
      color: colors.get()
    },
    exp: Math.floor(Date.now() / 1000) + 60 * 3 // expire in 3 minutes
  }, '<YOUR_SCALEDRONE_CHANNEL_SECRET>');
  res.send(token);
});

app.listen(3000, () => console.log('Server listening on port 3000'));
Putting it together
To test your newly created app start by running the authentication server:
cd server-dir
node index.js
Then run the iOS emulator:
react-native run-ios
Once everything has been set up correctly, you should see a single marker on the map. Even if you're testing on an actual device, you are likely sitting behind your computer and your marker not moving. That's no fun, and it makes testing a real pain. That's why we created the random_movement.js file to GitHub. Run it as a Node.js script and you will see three randomly moving users on the map:
node random_movement.js
Conclusion
As you can see, we created a simple Find My Friends clone with only a couple hundred lines of code. You can find the full source code or run the working prototype on GitHub. If you have any questions or feedback feel free to contact us.
Running on Android
With minimal code changes, this tutorial should run easily on Android. The required changes are:
- Use Google Maps
- Replace the iOS-only
AlertIOS.prompt()with something likereact-native-prompt-android - Wrap animating markers into an if-else clause like so.