Building a realtime voting app in React
Introduction
The importance and applications of realtime polling, realtime updates and data visualization can never be over emphasized. The convenience of casting votes online and the confidence that comes with knowing that your vote actually counts as you will see it do in realtime is one of the many reasons why so many countries, companies and individuals have come to adopt electronic opinion polls to gather data on the choices of the masses on relevant topics and ideas.
In this post, we’ll build a realtime voting system that will allow users to vote for their favorite football player and see their votes count in realtime. Of course you can extend this application to suit any use case that is particular to you, however, for the purpose of our demonstrations, we’ll stick to voting for players.
Prerequisites
A basic understanding of React and Node.js will help you get the best out of this tutorial. It is assumed that you already have Node and npm installed. If that’s not the case for you, kindly check Node.js and npm for further instructions and installation steps.
We’ll also use these tools:
Scaledrone - A realtime messaging platform that will power the realtime functionalities of our app. Go ahead and create a free account to gain access to the dashboard.
Axios: a promise-based HTTP client that works both in the browser and in a Node.js environment.
What we’ll build
We’ll build this voting system where users will vote for their favorite players and see their votes and that of other users in realtime.
Set up React project
First things first, let’s create our React project. I imagine you will be fairly familiar with this step, however, we’ll walk you through it nonetheless. Open a terminal window and install the React CLI tool globally by running this command:
npm install -g create-react-app
Now, open another terminal window on your Desktop and run this commands respectively to create a new React application using the CRA tool we just installed:
mkdir polling-app // create a new project folder
cd polling-app // navigate into the new folder
create-react-app my-app // create a new react project called my-app
cd my-app // navigate into the new react project
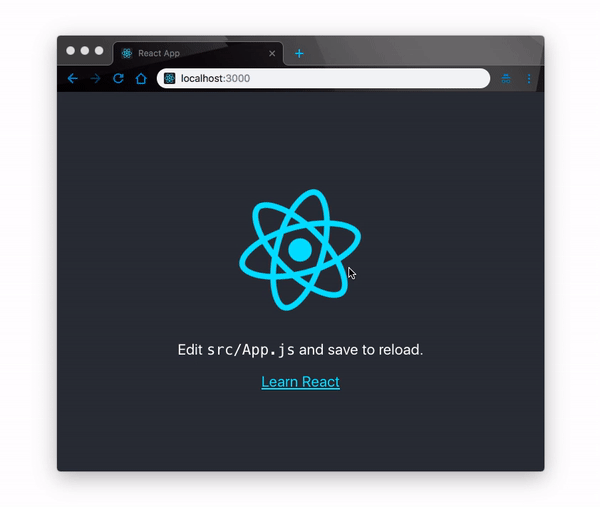
npm start // start the development server.
When you visit your default browser on localhost:3000, you should see your project live on the browser.
Now you can go ahead and open the project in your favorite code editor and we can start writing some code. Before we jump into it, let’s take a moment to understand our app.
Since, we are building a voting system, we’ll need a custom component where we’ll render our players and have users cast votes for them. Also we’ll define the mock data for our players in the App component where we'll equally handle server-client communications.
Finally we'll have a server file where we'll subscribe to Scaledrone and dispatch votes to all connected users in realtime. That said, let's get started.
Set up a Node server
Now that we’ve created the project, let’s first create our Node server before we dive into the app itself. What we want, basically, is to send a vote (the name of a player) to our server via a POST request, the server receives the vote and publishes it to the room where all subscribed users will see the result.
Install Scaledrone
To install Scaledrone to our application, open a terminal in the project root directory and run the following npm command:
npm install scaledrone-node-push --save
This will make Scaledrone available in our node_modules folder so that we can require it in our Node server. Since, we are here, let's install the other packages we'll need to build our server
npm install express body-parser axios cors --save
Next, let’s create our server. First, create a .env file to store our environment variables In the project root directory, then set it up like so:
//.env

CHANNEL_ID = YOUR_CHANNEL_ID
SECRET_KEY = YOUR_CHANNEL_SECRET
Note: You will replace the YOUR_CHANNEL_ID and YOUR_CHANNEL_SECRET placeholders in the file above with the real values from the your Scaledrone dashboard.
To set up the Node server, create a server.js file in the projects root directory and update it with the code below:
//server.js

require("dotenv").config();
const express = require("express");
const bodyParser = require("body-parser");
const app = express();
const port = 4000;
const Scaledrone = require("scaledrone-node-push");
CHANNEL_ID = process.env.CHANNEL_ID;
CHANNEL_SECRET = process.env.SECRET_KEY;
const sd = new Scaledrone({
  channelId: CHANNEL_ID,
  secretKey: CHANNEL_SECRET
});
app.use(bodyParser.json());
app.use(bodyParser.urlencoded({ extended: false }));
app.use((req, res, next) => {
  res.header("Access-Control-Allow-Origin", "*");
  res.header(
    "Access-Control-Allow-Headers",
    "Origin, X-Requested-With, Content-Type, Accept"
  );
  next();
});
app.post("/vote", (req, res) => {
  const { body } = req;
  const room = "live-votes";
  const response = { playerId: body.vote.player_id };
  const message = response.playerId;
  sd.publish(room, message, error => {
    if (error) {
      console.log(error);
    } else {
      res.json({
        player_id: body
      });
    }
  });
});
app.listen(port, () => {
  console.log(`Server started on port ${port}`);
});
Let’s walk through it. Here we created a new instance of Scaledrone with the ChannelID and SecretKey gotten from the Scaledrone dashboard as we’ll demonstrate along the way. Then we defined a /vote route to process our votes when the client makes a POST request to that endpoint with the name of a player to vote for.
Finally when the server receive the request, we publish the vote in the Scaledrone room we named live-votes. On the client, we’ll subscribe to the same room and listen for the events which when recieved, we’ll update the playerDetails object with the new vote for all connected users to see in realtime.
Set up players component
With the server set, let’s continue hooking up the client. In the project root src folder, create a new folder called components, inside it, create a new component called players.js and set it up like so:
//src/components/players

import React, { Component } from 'react';
class Player extends Component {
    handleClick = () => {
    // coming soon ...
    }
    render() {
        return (
            <div className="App">
                <img className="rounded-circle" src={this.props.image} alt="player" />
                <div className="mt-2">
                    <h5 className="card-title">{this.props.name}</h5>
                </div>
                <h5>Goals: {this.props.goals} </h5>
                <div>
                    <h2> Votes: {this.props.votes} </h2>
                </div>
                <div className="mb-3">
                    <button type="button" onClick={this.handleClick} className="btn btn-primary btn-lg">Vote For {this.props.name}</button>
                </div>
            </div>
        );
    }
}
export default Player;
Here, we have defined a template for our app UI. However, the values of these view elements are not present at the moment since we’re passing them into the players component from the App component via props. Let’s now set up the App component to update the players component with props.
Set up App component
To display the data we have defined for the UI elements in the players component, let’s open our App component and update it with the mock data we prepared for this project like so:
//src/App.js

import React, { Component } from "react";
import "./App.css";
import Player from "./components/players";
import cr7 from "../src/img/ronaldo.jpg";
import lm10 from "../src/img/lm10.jpg";
import pogba from "../src/img/paul.jpg";
const playerData = [
  {
    name: "Ronaldo",
    goals: 30,
    votes: 0,
    id: 1,
    image: cr7
  },
  {
    name: "Messi",
    goals: 8,
    votes: 0,
    id: 2,
    image: lm10
  },
  {
    name: "Pogba",
    goals: 26,
    votes: 0,
    id: 3,
    image: pogba
  }
];
class App extends Component {
  state = {
    playerDetails: []
  };
  componentDidMount() {
    this.setState({ playerDetails: playerData });
  }
  render() {
    return playerData.map(player => (
      <Player
        key={player.id}
        name={player.name}
        goals={player.goals}
        image={player.image}
        votes={player.votes}
        id={player.id}
      />
    ));
  }
}
export default App;
Notice that we added images locally to the project. Feel free to do the same, create a folder img inside the src folder and add your favorite player images to it, or simply reuse the sample images we used on this project, you can get it from the project repository.
Next, you may have noticed the Bootstrap classes on our view elements, let’s add the Bootstrap CDN to install Bootstrap and beautify the UI. Navigate to the project public folder and open the index.html file, add the CDN inside the documents <head> tag:
// public/index.html

<link href="https://stackpath.bootstrapcdn.com/bootstrap/4.2.1/css/bootstrap.min.css" rel="stylesheet" integrity="sha384-GJzZqFGwb1QTTN6wy59ffF1BuGJpLSa9DkKMp0DgiMDm4iYMj70gZWKYbI706tWS" crossorigin="anonymous">
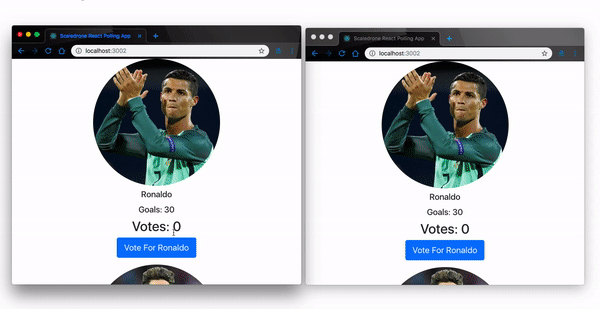
At this point, if you save and reload the browser, you should get the exact app UI as shown below:
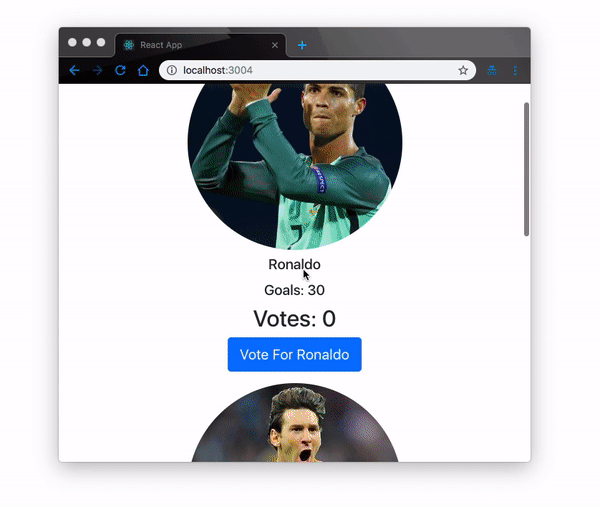
At the moment the app is stale. Nothing interesting happens on the app as of yet when you click a button to cast a vote for any player. Talking about votes, let’s get on with.
Set up Scaledrone
Before we dive into the process of casting votes, let’s first, visit the Scaledrone sign up page and create a Scaledrone account and get our credentials since we’ll need it for the next step.
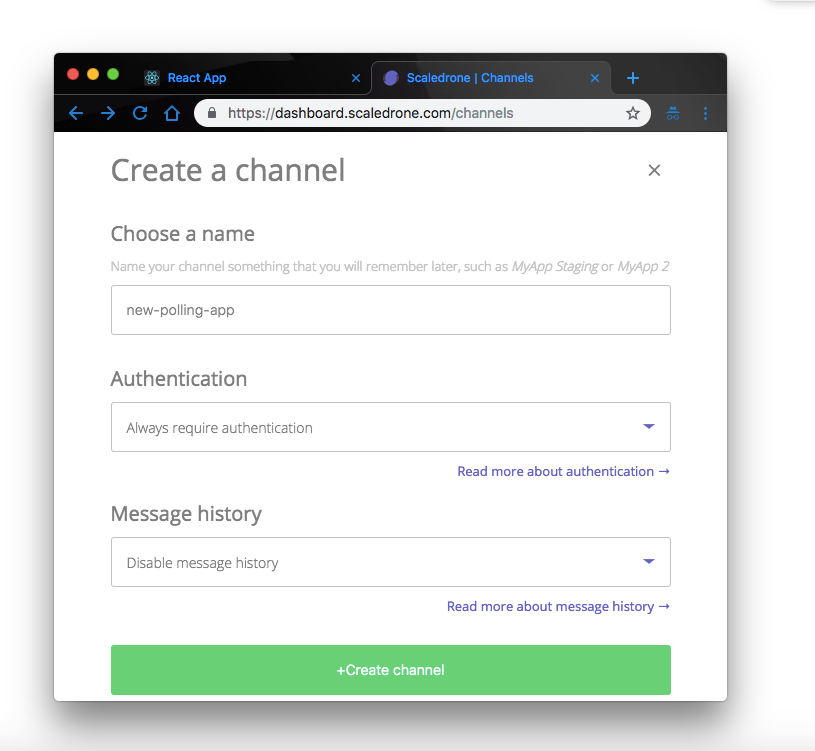
Once you’ve signed up, you’ll be required to create a channel. Creating a channel will give you access to the channels credentials like the ChannelID and Secret_key that we’ll use to establish connection to Scaledrone via our app.
Next we’ll create the channel. Click the button and provide a channel name
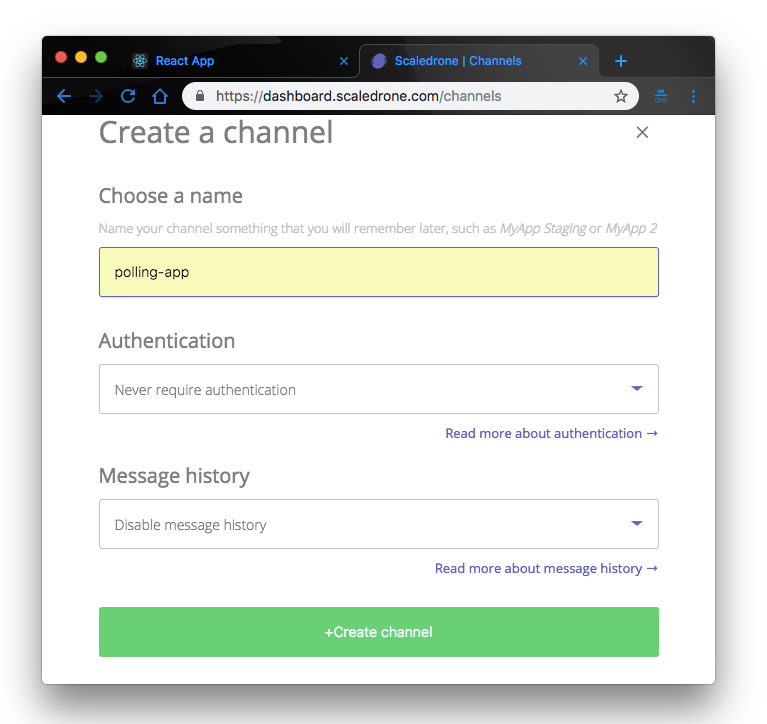
For now we’ll just provide the channel name and keep the defaults. In production you will have to properly authenticate your channels and manage user privileges however, we are only building for demonstration purposes so we can skip that for now.
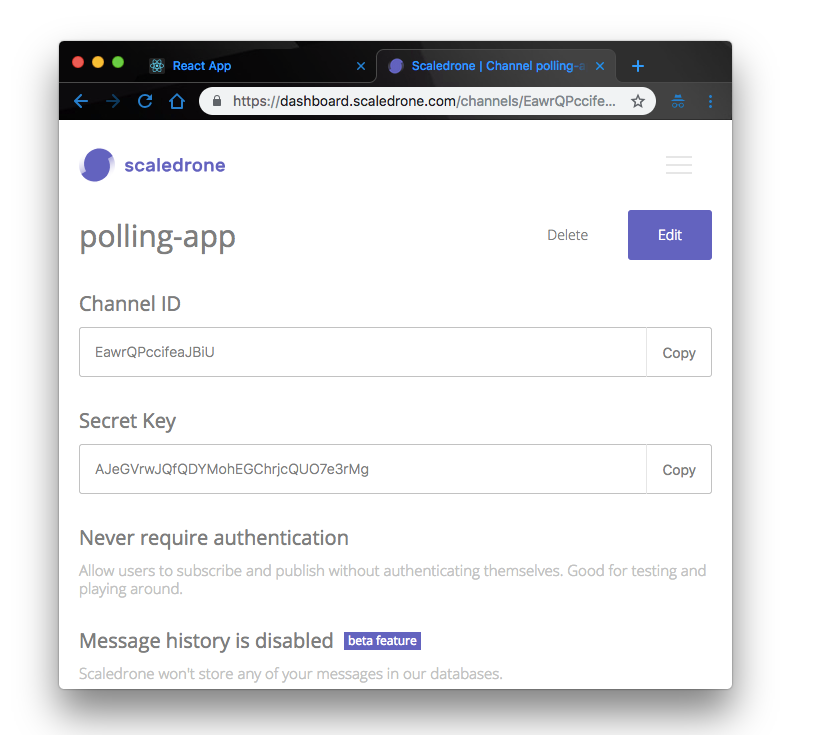
Finally when we create the channel, we’ll have access to this credentials. Keep them handy as we’ll be using them shortly. Also copy them into the server.js file we created at the begining and replace the CHANNELID and SECRET_KEY placeholders respectively. Now that we have successfully set up our Scaledrone credentials, let’s go back to our app and add some interactivity.
Add Scaledrone JavaScript CDN
Finally to interact with Scaledrone from the client, open the public/index.html file again and add the Scaledrone CDN to the <head> tag like so:
  // public/index.html

 <script src='https://cdn.scaledrone.com/scaledrone.min.js'></script>
Sending votes
So far we have a bare template with our players, their details and a button to cast a vote for them. Let’s hook up the buttons to send the votes to the server.
First, update the handleClick() function in the player component like so:
   // src/components/players.js

    handleClick = () => {
         this.props.onVoteCasted(this.props.name)
    }
Then in the App component, let’s define an event handler that will get the name of the player we are voting for from the players component and use Axios to post that player to the server. In the App.js file, add this code:
 // src/App.js

import axios from 'axios'; // import axios
  ...
  // below componentDidMount() and before render(), add handleEvent

  handleEvent = playerId => {
    const vote = { player_id: playerId };
    axios.post("http://localhost:4000/vote", { vote }).then(response => {
      console.log(response);
    });
  };
  ...
Here, the playerId variable is the name of the player the user is voting for. Once the user has clicked on a particular players vote button, the playerId variable will pass the name of the player to the handleEvent() callback function which will then post the player’s name to the server.
Next, Let’s add the onVotecasted props to the render() method to hook up the handleEvent() function here with handleClick() in the players component. Update the render() method like so:
 render() {
    return playerData.map(player =>
      <Player
        key={player.id}
        name={player.name}
        goals={player.goals}
        image={player.image}
        votes={player.votes}
        id={player.id}
++      onVoteCasted={this.handleEvent} // add this line
      />);
  }
Receiving votes
When the server receives the player to be voted for, it publishes the name in the live-votes room. On the client, we listen for the event. In the App.js file, create a constructor and update it with the code below:
// In App.js, before componentDidMount(), add the constructor

  constructor() {
    super();
    this.drone = new window.Scaledrone('vIh5lXOnewFxNIeC');
    this.drone.on('open', error => {
      if (error) {
        return console.error("Error");
      }
    })
    const room = this.drone.subscribe('live-votes');
    room.on('data', (data) => {
      this.state.playerDetails.map(player => {
        if (player.name === data) {
          return Object.assign({}, player, {
            votes: player.votes += 5
          });
        } else {
          return player;
        }
      });
      this.setState({
        playerDetails: this.state.playerDetails
      });
    });
  }
This is how we listen for the event on the room and update the playerDetails object with the new vote. First, we created a new Scaledrone instance globally with the channelID. Then we subscribed to the live-votes room to listen for an incoming message. When the message (players name) comes in from the server, we update the players votes by 5 counts and all connected users will see the update in realtime.
Demo
Now start the server (be sure to have added your Scaledrone credentials) by running this command in a terminal window on the project root directory:
node server
Then try out the application, you should get the same exact functionality.
Wonderful, the app works as expected!. But that's not all, let's authenticate
Authentication
In a real word application, it’ll make sense to manage user access to the voting channels. Take for instance, in our voting application, we can make the system a bit less hackable by authenticating the voters and managing their access to the voting room.
We will implement JWT authentication in our app. Basically we want to determine when users can either subscribe or publish to our voting room.
That said, let’s jump in. To implement this feature in our existing application, this is what we’ll do:
- First, create a new channel on your Scaledrone dashboard and set the
Authenticationfield to 'always require authentication':
-
Next copy the keys of this new channel into your project, replace it with the existing keys from the previous channel in both your
App.jsfile andserver.jsfile. Then run the app again, you’ll notice that you can’t send votes. That’s because you can only communicate with the channel as an authenticated user, which at the moment you’re not. So let’s get you authenticated. -
Install JSON web token. Navigate back to your project root directory and run
npm install --save jsonwebtoken
-
When a user connects to a Scaledrone room, in our case the “live-votes” room, a unique
clientIdis assigned. We’ll retrieve and send thisclientIdto the server and then use it to generate a token. The token will contain the users permissions which will determine wether the user can publish or subscribe to the room. So in yourApp.jsfile, update your constructor like this://src/App.js constructor() { super(); this.drone = new window.Scaledrone("w4BKWxiW6yzeGrN3"); this.drone.on("open", error => { if (error) { return console.log(error); } const user = { clientId: this.drone.clientId }; axios.post("http://localhost:4000/auth", { user }) .then(response => response.data) .then(jwt => this.drone.authenticate(jwt)); }); this.drone.on("authenticate", error => { if (error) { return console.error(error); } console.log("Authenticated"); }); const room = this.drone.subscribe("live-votes"); room.on("data", data => { this.state.playerDetails.map(player => { if (player.name === data) { return Object.assign({}, player, { votes: (player.votes += 5) }); } else { return player; } }); this.setState({ playerDetails: this.state.playerDetails }); }); }
This will send the user’s unique id to the server and use the returned token to authenticate the user. To hook up the server functionality, go ahead and add this route to your server.js file:
//src/server.js
const jwt = require('jsonwebtoken');
...
app.post('/auth', function(req, res) {
  const { body } = req;
  const userId = body.user.clientId
  if (hasChannelAccess(userId)) {
    const payload = {
      client: body.user.clientId,
      channel: CHANNEL_ID,
      permissions: {
        '^live-votes$': {
          publish: true,
          subscribe: true,
        },
      },
      exp: Math.floor(Date.now() / 1000) + 60 * 3 // token epires in 3 minutes
    };
    const token = jwt.sign(payload, CHANNEL_SECRET, {algorithm: 'HS256'});
    res.status(200).end(token);
  } else {
    res.status(403).end('Sorry! You are not allowed.');
  }
});
function hasChannelAccess(req) {
  // Your should implement your own authentication code here.
  // You could query your user from your database and see if they are allowed to
  // connect or give them user-scoped access using JWT permissions
  return true;
}
Here, we defined the payload, gave publish and subscribe permissions to the user, generated a minute token for the user and sends it back to the client. This is exactly the functionality we wanted. At this point, when you run your server and reload the app, you should now be able to cast votes as you did before.
If we wanted to allow the users to subscribe to the live-votes channel but not publish votes into it, all we have to do is update the permissions object in our payload like so:
permissions: {
        '^live-votes$': {
          publish: false,
          subscribe: true,
        }
}
With this, you can authenticate and manage users access to your application’s channels.
Conclusion
Scaledrone is a realtime service provider that powers both mobile and web applications alike. In this application we have leveraged its capabilities to build an extendable realtime voting platform for the web and equally discussed a few React tips along the way. There’s so much you can do with Scaledrone and this project is just one of many. Feel free to look through the documentation for more. If you will like to get your hands on the project source code, visit the project repository.