iOS Machine Learning: Understanding The Basics
Machine learning is one of those terms in programming that sounds like you need a PhD from Stanford to understand, but is in reality pretty simple and easy to get started with. Here's some big words, don't panic: iOS lets you train your own convolutional neural network using transfer learning. By the end of this article you'll understand every term from the earlier sentence.
Apple also provides a bunch of different tools and frameworks for out-of-the-box machine learning features and it can be confusing to know how they all fit together and where you should start. This article will shine some light on this issue and point you in the right direction.
Recognizing cats is just one of the many uses for machine learning. You can process a sentence and detect its meaning or emotion. Speaking of emotions, you can tell whether a person is happy or sad from their photo. You can detect faces, landmarks, read text in an image or even get a textual description of an image. Machine learning is a simple but very flexible tool to solve all kinds of problems.
How does machine learning work?
Let's think about how you would recognize a car in an image. You, as a human, have eventually learned that cars have some car-like features. Most of them have four wheels. They're roughly cuboid in shape. They usually have doors with windows on the sides and big windows at the front and back. We can go on and on, but you get the gist: you recognize a car by recognizing a set of car-like features.
Not all of those features are equally important. Some cars have a spoiler, but the absence of a spoiler does not automatically make something less car-like. However, missing two out of four wheels makes something much less car-like. In other words, some features carry more weight than others.

(Lit Motors C-1: Technically a car?; credit: Intel Free Press)
Machine learning works the same way. A machine learning model contains a set of features, each with their own weight. The model will then recognize those features in the original image, sum them all up with their respective weights, and pop out a result.

(credit: Perceptron. Mitchell, Machine Learning, p87.)
But summing up the features is easy: what's complex is finding those features and how much does each feature matter. When machine learning first started, humans would program in those features. They would analyze the data, find connections and patterns and program in those patterns.
The "machine" part was learning how much each feature actually matters. Each feature is multiplied by a weight, which can either increase of decrease how much it impacts the result. The model starts out with random weights. You then give it an image of a car and tell it "this is a car." It will modify the weights so that the output for that image is "car". You then repeat this process for thousands or millions of images, and you get back a model with correctly configured weights. This process is called training.
Because you configured the model with thousands of car images, the model should produce the output "car" for a new, never before seen, image.
Of course, lots of things can go wrong in this step. If you give the model only a few images, it might be very unsure of the answer. This is called under-fitting. However, giving the model too much information is also not good, because it will think only cars with spoilers are cars. This is called over-fitting. By selecting the correct features and giving it enough data we strike a balance between over-fitting and under-fitting.
To make sure our model behaves correctly we always take a bit of data we have and don't feed it to the model. We can then check what result we get from the model when we give it that data, so that we can check if it's working correctly or not. This is called validation.
Neural Networks
What I described here is traditional machine learning. Convolutional neural networks are a part of deep learning and they go one step further: in CNNs, even the features are learned automatically. All you do is adjust a few parameters, give it the inputs and outputs and the network does the rest. Pretty cool, right?
They do this by basically trying out what works, and discarding what doesn't. They might learn to recognize spoilers, but realize those don't really matter all that much. Or they might say wheels are somewhat important, but the number of wheels is very important.
At the end of this training process you get a convolutional neural network, which is a set of features and weights connected in layers to other features and weights.
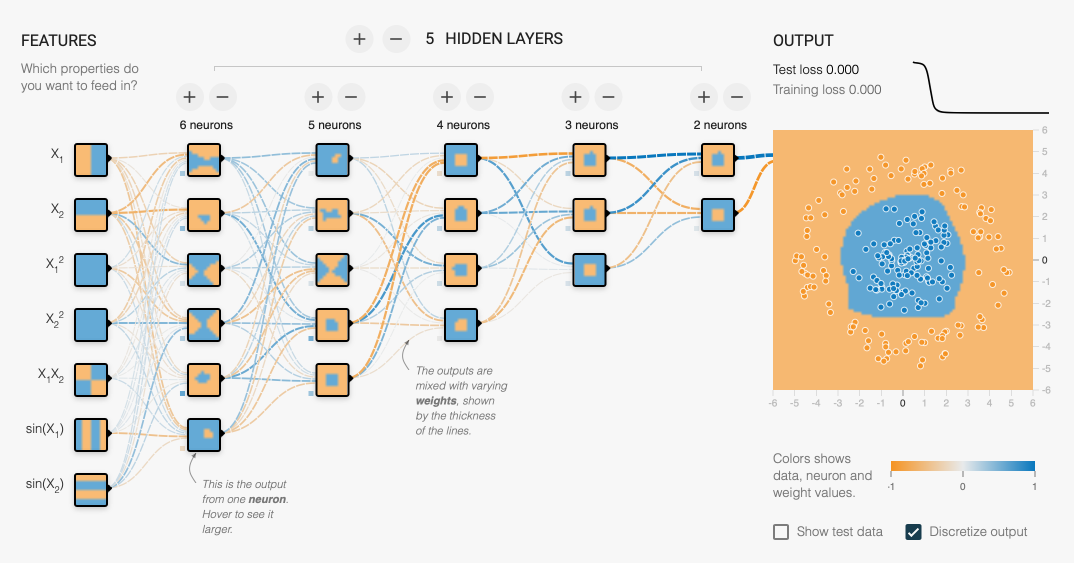
(https://playground.tensorflow.org)
If you teach a human to recognize dogs, you can very easily teach them to recognize cats. Just tell them "they're kind of like dogs, but more self-centered and smaller." CNNs are the same way. If you have a network that recognizes cats, you can easily reuse most of it for dogs. If you can recognize cars, you can probably also recognize motorcycles. Just take the same features but give them different weights!
This process of reusing networks is the standard way people use machine learning today. If you want your own image classifier, you take a network that's been trained on millions of images, and add your own bit of data to that. The network already knows how to recognize all kinds of features, so it can easily adapt to your specific images. This type of machine learning is called transfer learning.
What does iOS offer?
As machine learning found its way into mainstream software development, Apple gave us lots of tools to use it. They range from easy to use libraries all the way to command line scripts to make your own models.
Here's an overview of the different machine learning tools Apple provides:
Vision
Vision is a framework for working with images. It contains ready-made functions for detecting rectangles, text and barcodes (including QR codes). This is perfect for scanning loyalty or gift cards, receipts, stickers, documents and other rectangular objects.
Vision also offers easy to use face detection and tracking, so you can identify people inside photos and make sure the image is cropped correctly, the person is in focus and other cool things that improve the user's experience.
The first step in using Vision is to create a VNImageRequestHandler. This class is responsible for performing requests and calling completion handlers. It also keeps track of the image you want to work on.
let requestHandler = VNImageRequestHandler(
    cgImage: image,
    options: [:])
Your next step is to create a request which will specify what the handler should do. In this case, we'll create a face detection request. These can be reused for multiple images, and you can use multiple requests in tandem on a single request handler, so you can detect, for instance, both rectangles and text at the same time.
let request = VNDetectFaceRectanglesRequest { (request, error) in
    guard
        error != nil,
        let results = request.results as? [VNFaceObservation]
    else {
        print(error ?? "results are incorrect")
        return
    }

    for result in results {
        print("Found a face at \(result.boundingBox.origin)")
    }
}
Finally, we perform the actual request.
do {
    try requestHandler.perform([request])
} catch {
    print(error)
}
And that's pretty much all there is to it!
Natural Language
A framework like Vision, but used for analyzing human languages. For instance, Natural Language lets you split a sentence into words and get information about each word, like if it's a number, an emoji or something else.
You can also detect unknown languages. Using NLLanguageRecognizer you can find out what's the most likely language of some string. This can help you automatically translate different languages for users, or to detect what language your users prefer and adjust your app accordingly.
Another big use case of Natural Language is linguistic tagging. Tagging gives you more information about your users input. You can split a sentence into nouns, verbs, adjectives etc. to parse natural language commands. You can also identify people or places that are mentioned in the sentence. This makes it easy to recognize things like "Add a reminder to buy Suzan a present for her birthday."
If you want to get the names from a string, you can create an NLTagger with the .nameType tag scheme. This scheme also includes place and organization names, so the tagger will also detect those.
let tagger = NLTagger(tagSchemes: [.nameType])
tagger.string = text
Next, call enumerateTags to get all the tags.
tagger.enumerateTags(
    in: text.startIndex..<text.endIndex,
    unit: .word,
    scheme: .nameType,
    using: { (tag, range) in
        if tag == .personalName {
            print("Found name: \(text[range])")
        }
        return true
	})
Since we're only interested in personal names, we'll print those out and ignore the other tags.
Core ML
Core ML lets you use your own custom machine learning models. This can be any model, from pre-made ones you found on the internet all the way to models you trained from scratch. You can use Core ML to load models and then combine them with Vision or Natural Language for things like object recognition or complex language processing.
Apple also provides a set of ready-mode models for working with images. Different models are good at different tasks. For general object recognition, I recommend starting with MobileNet as its optimized for mobile devices.
To use one of these models, simply download it and drag and drop it into your Xcode project. You can then use Core ML to instantiate that model.
let model: VNCoreMLModel

do {
    model = try VNCoreMLModel(for: MobileNet().model)
} catch {
    print(error)
    return
}
To use it with vision we'll create a request just like in the Vision example, but this time it's a Core ML request with our model.
let request = VNCoreMLRequest(
    model: model,
    completionHandler: { request, error in
        guard
            let results = request.results as? [VNClassificationObservation]
        else {
            return
        }

        for result in results {
            print("Found object: \(result.identifier)")
        }
	})
We can then perform this request just like in the above example. As you can see, you can add object recognition to your app in just a few lines of code!
Create ML
While Core ML lets you use your own models, Create ML lets you create them from the data you have. Create ML is optimized for macOS and is integrated with Xcode's playgrounds, so it's the easiest way for iOS developers to train their own machine learning models.
To create an custom image classifier model, simply launch a new macOS playground and write these two lines of code:
import CreateMLUI

let builder = MLImageClassifierBuilder()
builder.showInLiveView()
A new pane shows up in the assistant editor where you can drag and drop images organized by class. Each class needs to have its own folder. Drag and drop those folders and the training will start immediately.
You can also tweak settings like how many iterations it will take, or whether it should create new input images by morphing the original ones to make the model more robust.
This is where transfer learning kicks in: Apple has their own network to recognize images, so Create ML is really fast and produces tiny models, because it leans heavily on the knowledge it already has. Once you have a model you can use Core ML to add it to your app like in the example above.
Turi Create
Used for the same purpose as Create ML, but it's a little more flexible and supports more types of models. The catch is that it's a Python library, so no Swift support!
But don't worry if you never used Python. Setting up Turi Create couldn't be easier, and Python is a very simple language that you can get the hang of pretty fast. Turi Create is out of scope for this article, but it's good to know that you can get even more flexibility when you run into issues with Create ML.
Start Using ML
As you can see, Apple offers a lot of tools with varying levels of flexibility. If you need general object detection, you can easily use Vision. If you want to detect a specific object, you can build your own model with Create ML and use Core ML in combination with Vision to detect that object. Trust me, it sounds a lot more complicated than it really is.
I urge you to try some of these approaches out. Machine learning is hitting the mainstream hard, and it's here to stay. By learning more about it you can still be ahead of the curve and provide your users with cool features your competitors might not have. Good luck!