Text to Speech Using AWS Polly
Serverless is the latest buzz among the modern application development. The most generic way to explain serverless is to get away with the regular always-running applications and instead focus on run-on-demand applications (besides using 3rd party services).
Serverless architectures are application designs that incorporate third-party “Backend as a Service” (BaaS) services, and/or that include custom code run in managed, ephemeral containers on a “Functions as a Service” (FaaS) platform. By using these ideas, and related ones like single-page applications, such architectures remove much of the need for a traditional always-on server component.
Here is a recent write up from Martin Fowler explaining the serverless architecture in detail.
I will not use the serverless keyword again until the end of this article where we will list out all the services that we use in this application and how this overall solution turns out to be ser...less :)
So to start, we will build a simple web API which converts a given text content to an audio file using the AWS Polly service, pretty simple.
Amazon Polly is a service that turns text into lifelike speech, allowing you to create applications that talk, and build entirely new categories of speech-enabled products. It uses advanced deep learning technologies to synthesize speech that sounds like a human voice.
We will deploy the related components manually using the AWS console, so we could get an idea of how things are integrated and glued together.
Overview
The following diagram shows how the overall application is structured and how it will flow.
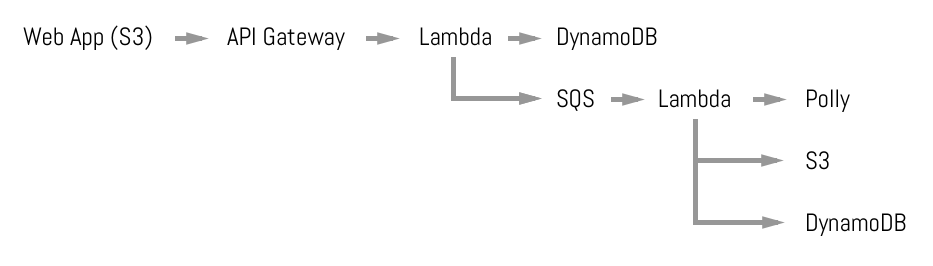
- The HTTP API will be using API Gateway and Lambda to save data to a DynamoDB table.
- Once the data is saved into a DynamoDB table, it will trigger another Lambda function via SQS queue, which is responsible for converting text to speech. The conversion may take time, so we will keep a status in each entry to mark whether the conversion is done or not.
- Once the conversion is finished, it will save the newly generated audio file on S3 and update the DynamoDB table entry with the file path and status
- When we call the GET API, it should show the entries with the conversion status and audio file path if they are converted.
Let's start
DynamoDB
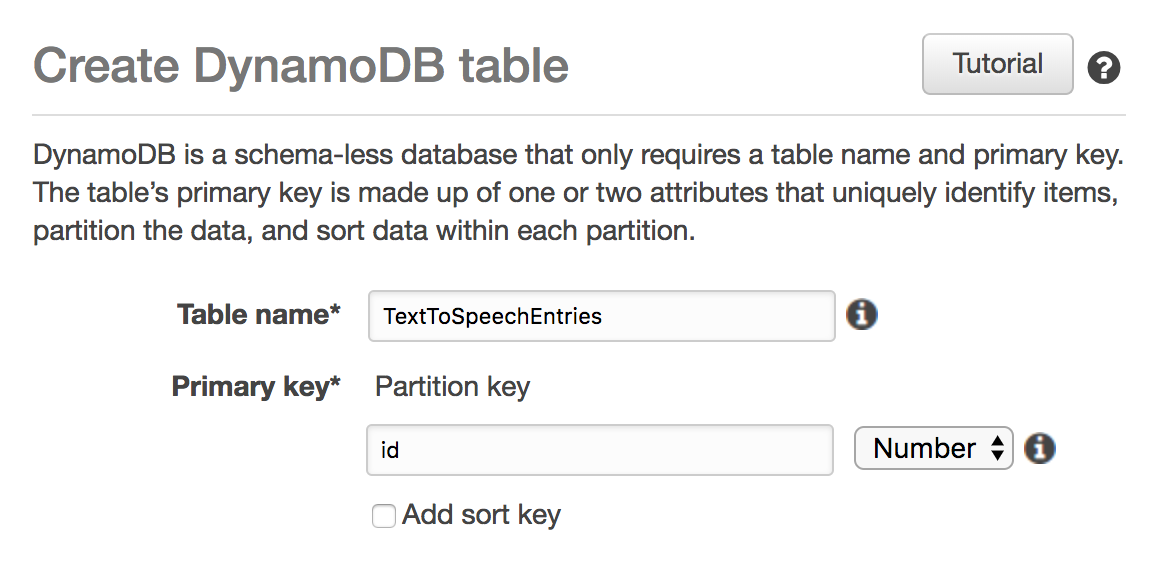
First, let's set up the DynamoDB table. Amazon DynamoDB is a fast and flexible non-relational database service for all applications that need consistent, single-digit millisecond latency at any scale.
We just need an ID for the table creation. Go to DynamoDB from AWS console and create the table with the following definition.
Lambda Role
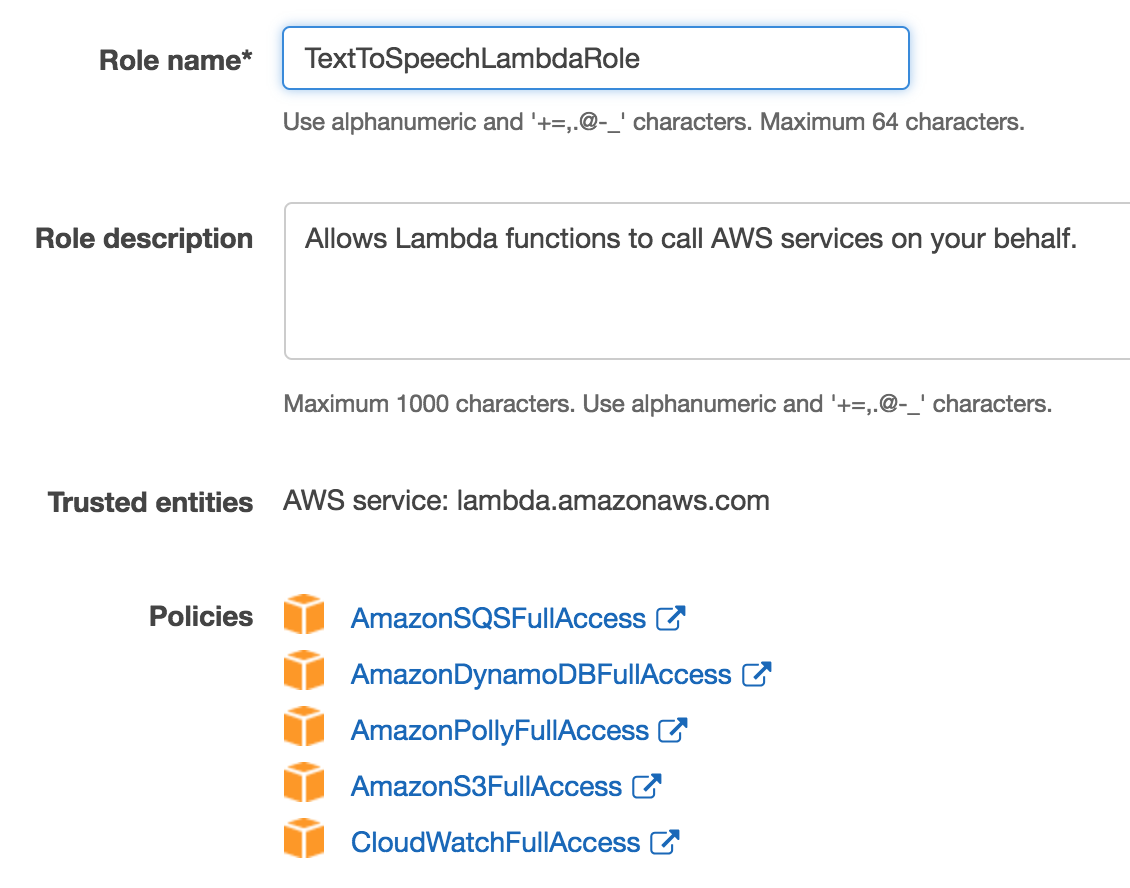
Next, we will create Lambda functions, but before that, we will create a basic role for Lambda functions which will allow our functions to access other AWS services such as S3, DynamoDB and SQS.
Go to the IAM (Identity and Access Management) service from AWS console and create a new role.
Lambda Functions
AWS Lambda lets you run code without provisioning or managing servers. You pay only for the compute time you consume - there is no charge when your code is not running.
We will have a total of three Lambda functions:
addEntry- to add a new text entry for conversion into DynamoDBgetEntries- to get all the existing entries from the DynamoDB tableconvertEntryToAudio- to convert the new entry from text to speech
We will be using Node 6 for the Lambda code, and you will notice that even though we are using Node, the functions are pretty simple and do not contain any extra resources or files like
package.jsonornode_modules. By default, AWS provides some libraries to Lambda functions at runtime which we have used, thus eliminating any external librarires.
Add Entry Lambda Function
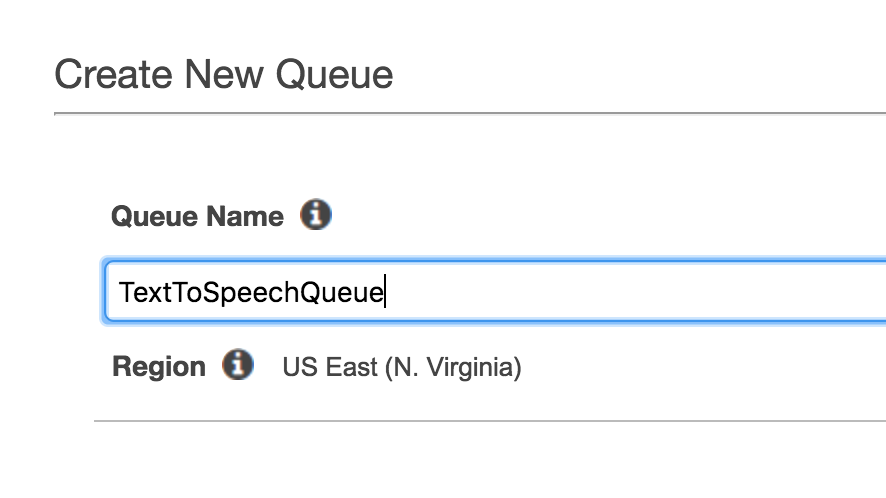
We will create the addEntry Lambda function and assign the newly created role. This function accepts the text and the voice we need to convert and then saves the data to a DynamoDB table. It then drops a message to SQS Queue for the conversion Lambda function to trigger.
Amazon Simple Queue Service (SQS) is a fully managed message queuing service that enables you to decouple and scale microservices, distributed systems, and serverless applications.
const AWS = require('aws-sdk');
const uuid = require('uuid');

const docClient = new AWS.DynamoDB.DocumentClient();
const sqs = new AWS.SQS();

exports.handler = (event, context, callback) => {
    const record = {
        id: uuid(),
        text: event.text,
        voice: event.voice,
        status: 'PROCESSING'
    };

    const params = {
        TableName: process.env.DB_TABLE_NAME,
        Item: record
    }

    docClient.put(params, (err, data) => {
        if (err) {
            context.succeed({success: false, error: err});
        } else {
            sqs.sendMessage({
                MessageBody: record.id,
                QueueUrl: process.env.QUEUE_URL
            }, (err, data) => {
                if (err) {
                    context.succeed({success: false, error: err});
                } else {
                    context.succeed({success: true, data: record});
                }
            });
        }
    });
};
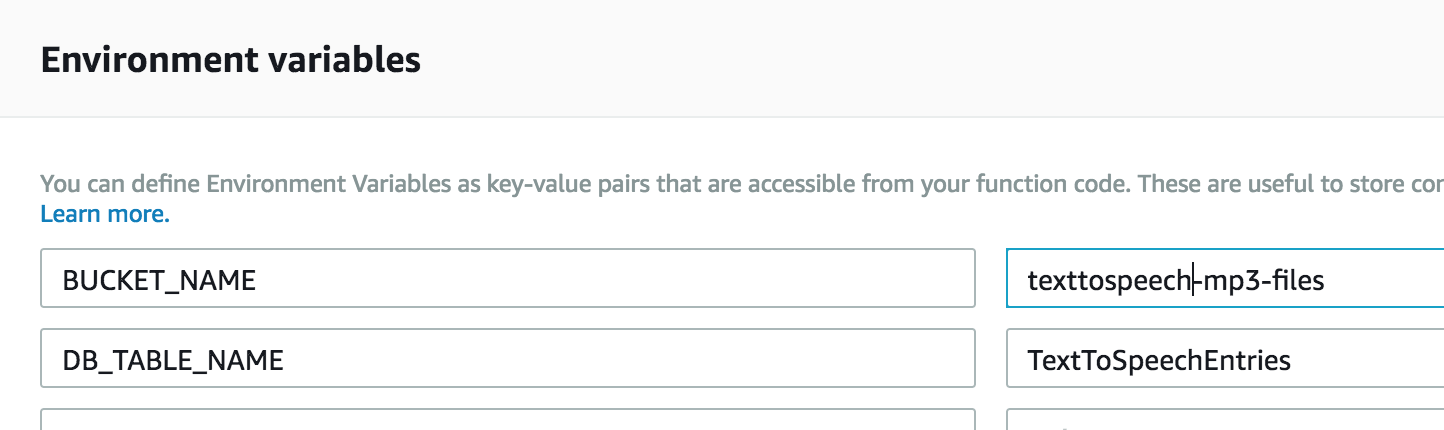
Lambda functions can accept environment variables like regular Node applications. We will be passing two variables: DB_TABLE_NAME and QUEUE_URL.
There is a section to pass the environment variables in the Lambda console, where we will place the DB_TABLE_NAME and QUEUE_URL variables.

Now as the entries are being saved, we will create our next Lambda function to convert the text to speech.
Convert Text To Speech Lambda
The conversion logic is pretty long, so I have put it in a Gist for easy reading.
https://gist.github.com/dhavaln/cf788d61c50d7d015082d40efc514489
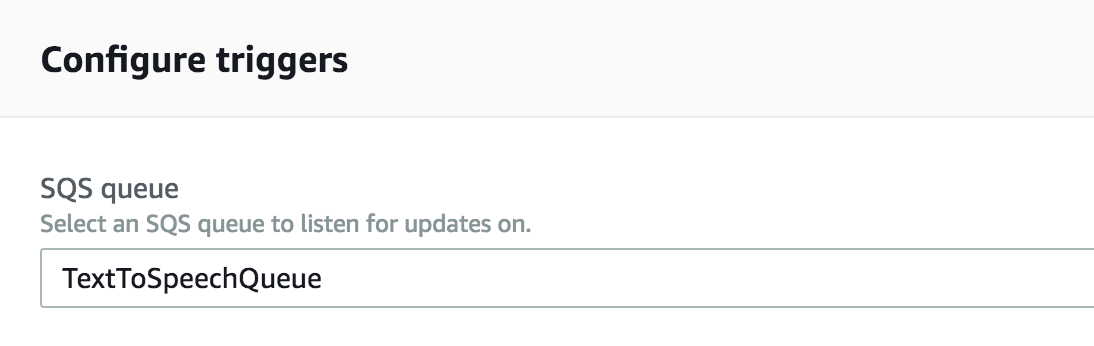
You can save the code from this Gist to the Lambda function, and then configure the input trigger from the left section of the console.
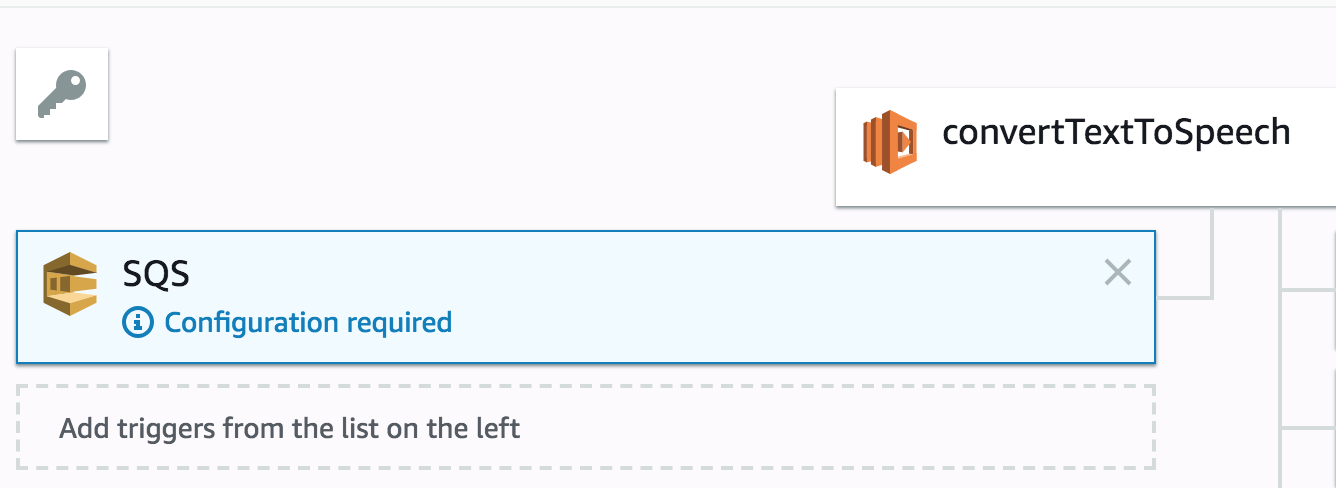
As this is a triggered Lambda function, we will have to select the input trigger from the left section. Select SQS and our newly created SQS queue.
After the conversion, the Lambda function stores the newly created audio file on S3 and updates the DynamoDB table entry status. We will have to give the S3 bucket a name using the environment variable indicating where the files will be stored along with the table name.
When we save files to S3 buckets, we can provide the ACL rights along with the request. In our case, because we want the audio files to be publicly accessible, we are passing
public-readwhile saving the files inside S3.
Now that we have the Lambda function ready we will add the code to get the entries from our TextToSpeechEntries DynamoDB table.
Get Entries Lambda Function
This Lambda function scans through the DynamoDB table and returns the records based on the input data. If no input is given, it will return all, and if an ID is given, it will return only that single entry.
const AWS = require('aws-sdk');

exports.handler = (event, context, callback) => {
    const docClient = new AWS.DynamoDB.DocumentClient();

    const params = {
        TableName: process.env.DB_TABLE_NAME
    };

    if (!event.noteId || event.noteId === ''){
        docClient.scan(params, (err, data) => {
            if (err) {
                context.succeed({success: false, error: err});
            } else {
                context.succeed({success: true, data: data.Items});
            }
        });
    } else {
        params.Key = {
            "id": event.noteId
        };
        docClient.get(params, (err, data) => {
            if (err) {
                context.succeed({success: false, error: err});
            } else {
                context.succeed({success: true, data: data.Item});
            }
        });
    }
};
Now we have all of our Lambda functions ready, and we can finally put them to the test! 🎉
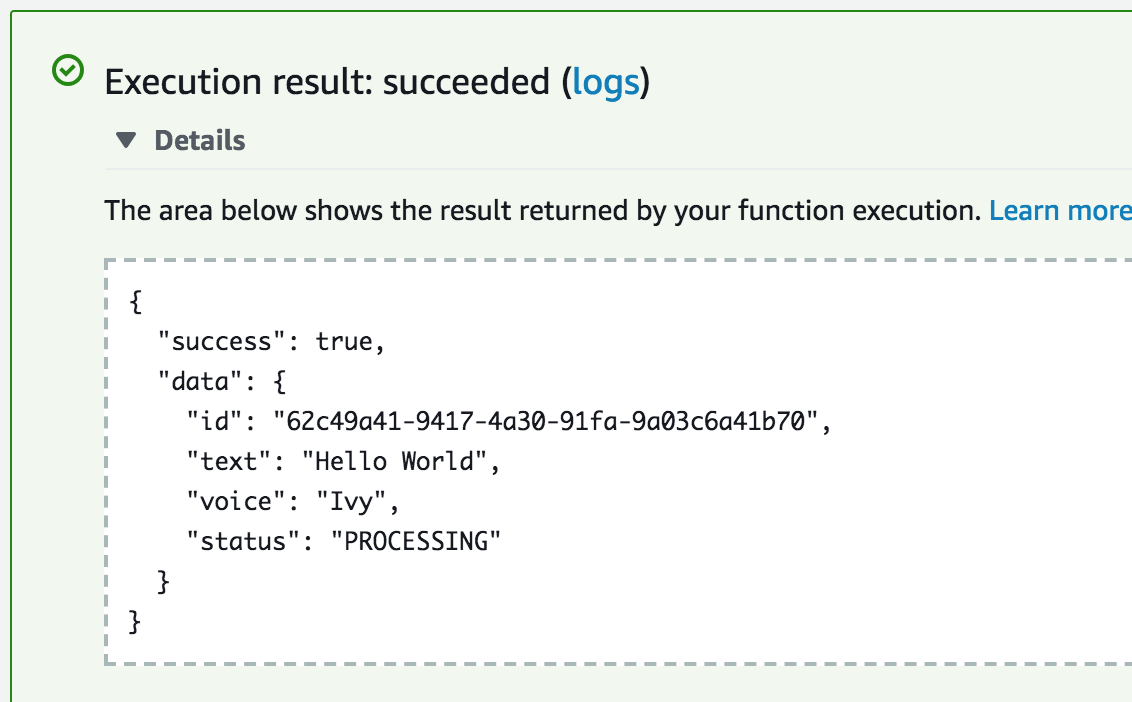
Testing addEntry function
Lambda console gives an option to easily test the functions. We can create a new test event and then run the test.
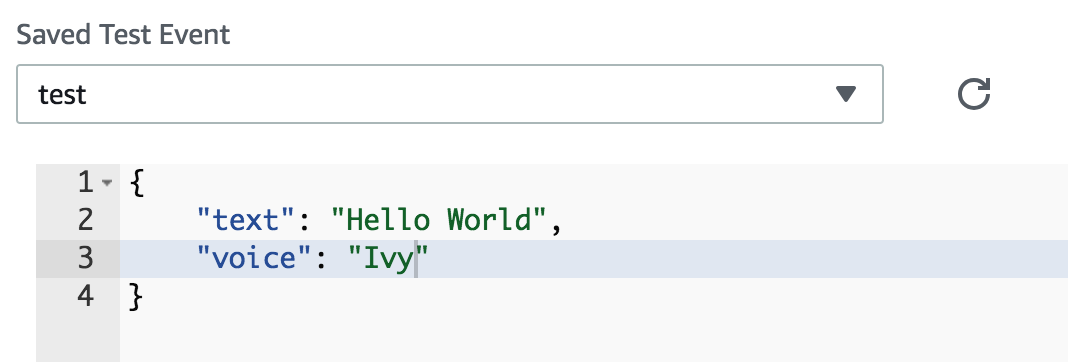
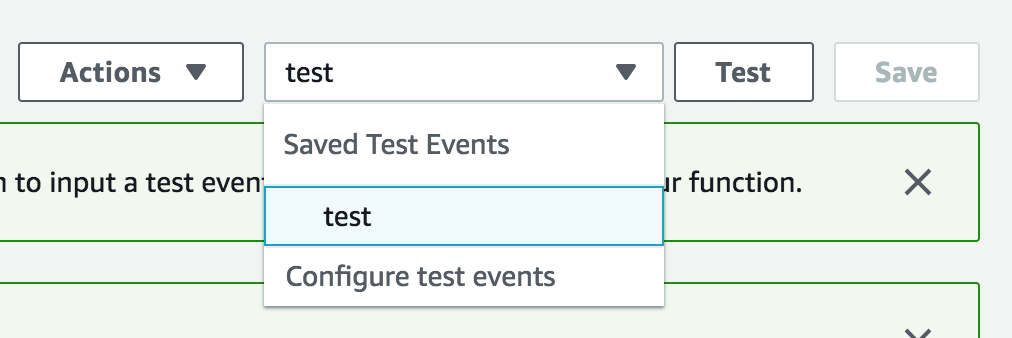
The test result should come down like this.
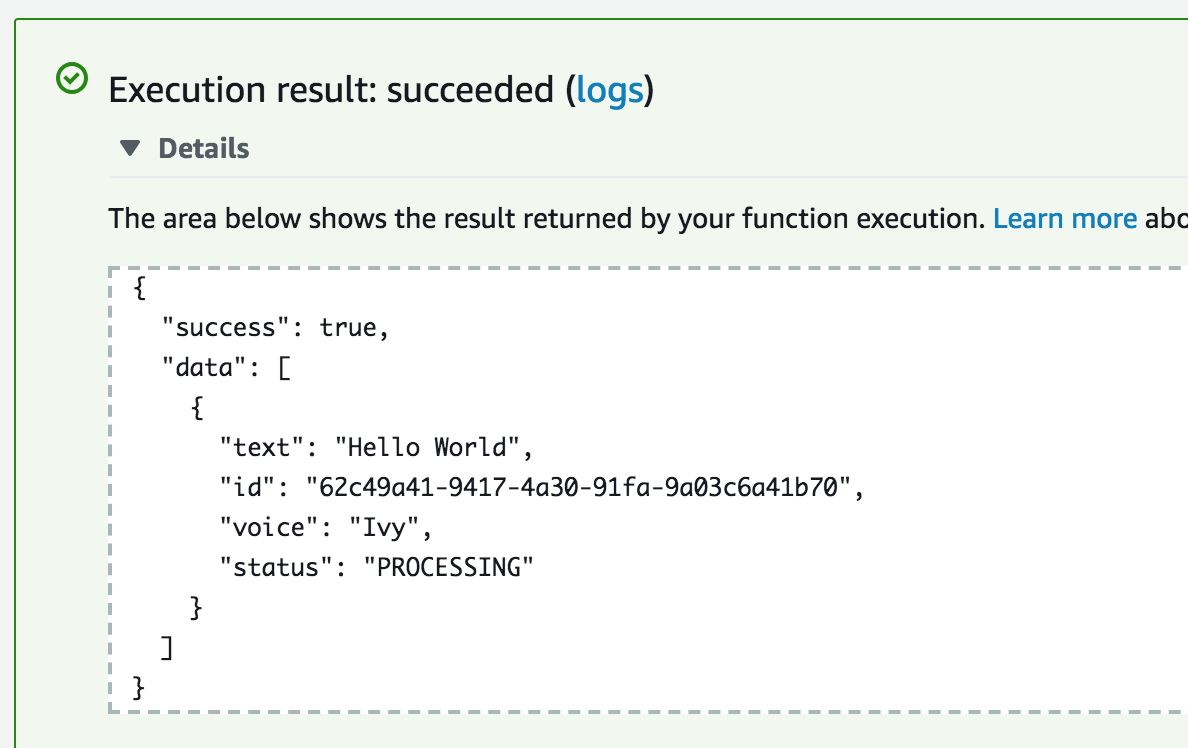
Testing getEntries function
To check whether the addEntry event has ran and saved the data properly, let's run the getEntries test and make sure that everything looks good.
To get all the entries, we will not pass any properties in the test event for this function. It should return the following data.
And with this, our basic Lambda functions are working! To call them via HTTP requests we need to integrate them with the API Gateway.
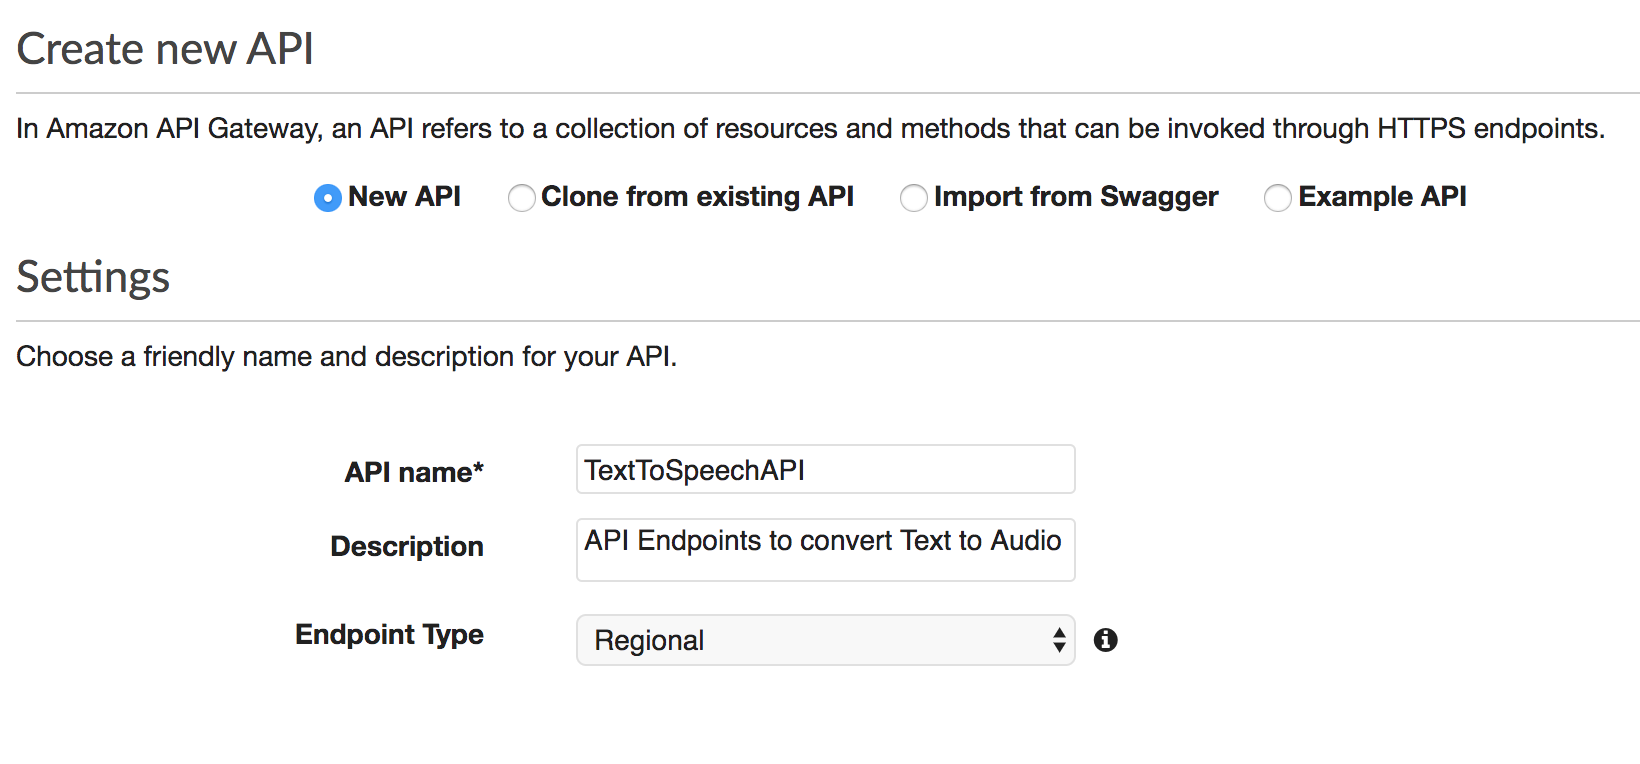
Setup API Gateway
Amazon API Gateway is an AWS service which allows developers to create HTTP(s) endpoints, and tie the request to other endpoints such as Lambda.
Amazon API Gateway is a fully managed service that makes it easy for developers to create, publish, maintain, monitor, and secure APIs at any scale. With a few clicks in the AWS Management Console, you can create an API that acts as a “front door” for applications to access data, business logic, or functionality from your back-end services
Let's create our API Gateway.
Once the API Gateway is ready now we need to create acceptable endpoints to accept GET and POST requests. This is similar to how you'd define endpoints when coding a regular REST API.
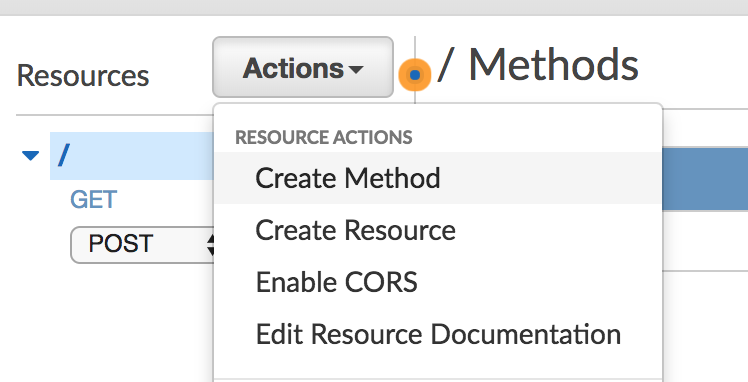
We'll be creating two endpoints:
- GET method for
getEntries - POST method for
addEntry
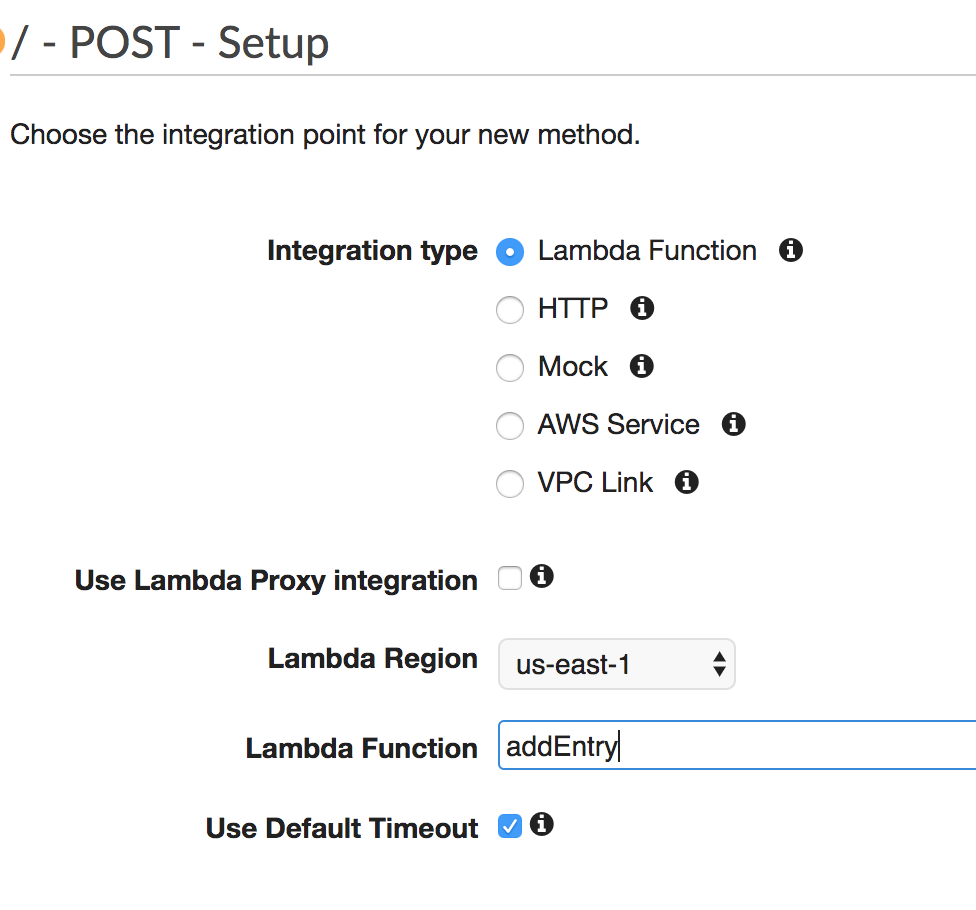
When you create the GET and POST methods, AWS will show you the configuration screen to attach the Lambda functions that we created.
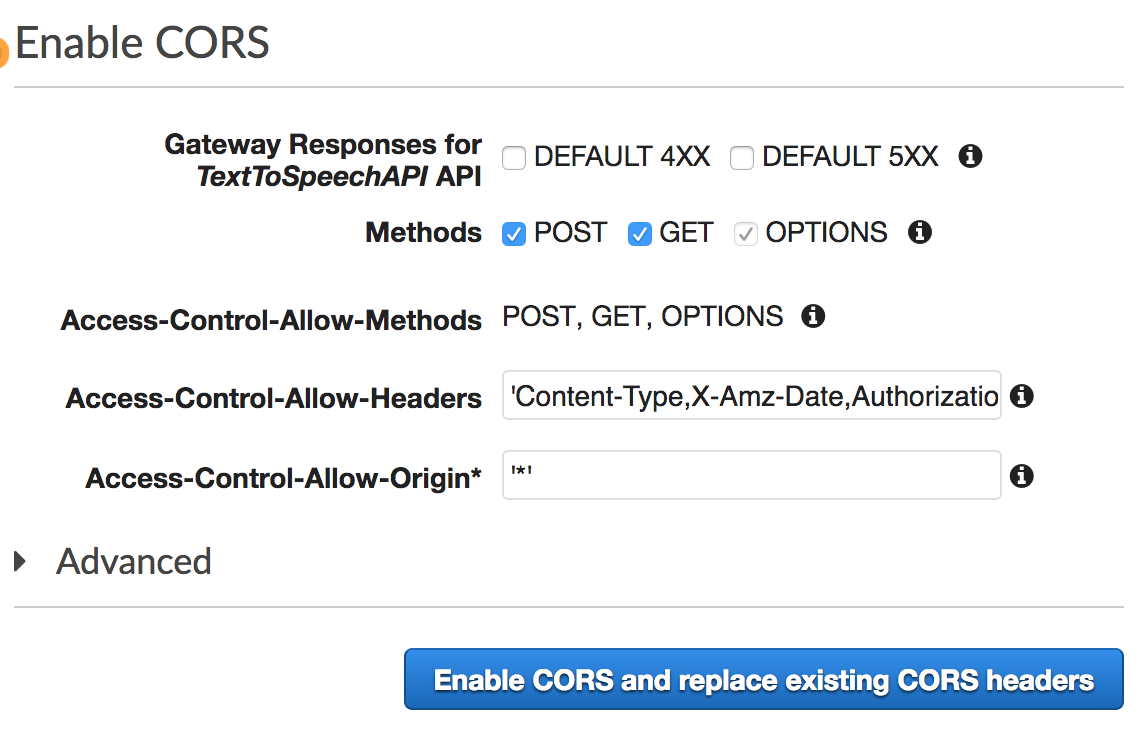
Enable CORS, as the APIs run in different context we need to make them accessible by other applications.
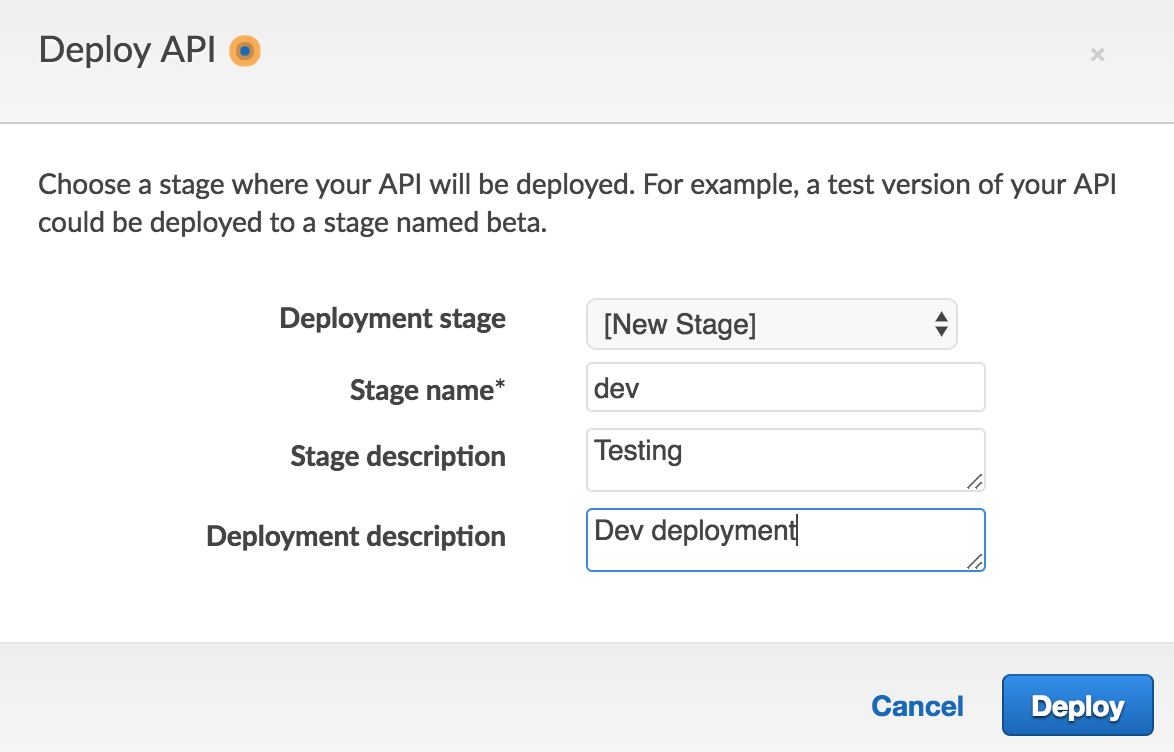
Now we have the API Gateways ready to be deployed into AWS environment.
When we deploy the API Gateway AWS will ask for the staging information, this way we can manage multiple stages and also support different versions of the same API.
Once the deployment is done, AWS will generate a unique URL through which we can access all the endpoints that we created. We will now test the APIs from cURL and make sure it works fine.
When we run the GET request in cURL we get the following response showing that everything is working fine.
$ curl https://t9rps5q56h.execute-api.us-east-1.amazonaws.com/dev/ | json_pp
{
   "success" : true,
   "data" : [
      {
         "status" : "PROCESSING",
         "voice" : "Ivy",
         "text" : "Hello World",
         "id" : "e9e03fe5-07e5-4589-8494-fc7c1d3caf53"
      }
   ]
}
Conclusion
Besides the title, I have resisted myself from mentioning anything related to Serverless, so it is now time to explain how this entire application is actually a serverless web application.
- API Gateway - fully managed service that makes it easy for developers to create, publish, maintain, monitor, and secure APIs
- Lambda - function-as-a-service, one of the most important pieces of any serverless application is the part where the actual logic runs. In our case it is used to run the
addEntryandgetEntriesfunctions. - DynamoDB - fully managed NoSQL database
- SQS - fully managed message queuing service
- S3 - Object storage built to store and retrieve any amount of data from anywhere
All of the services we used are managed, or 3rd party services. They are meant of specific purposes and we use them as and when required in our application.